
Are you struggling to find the perfect nail look for the upcoming season? Or perhaps you’re tired of committing to intricate designs, but still want to showcase your personal style? If you’re anything like me, the thought of replicating a complicated design can be daunting, especially when all you want is a simple, yet chic look.
As the leaves change and the air cools, the desire for a fresh nail design is undeniable. But, you don’t have to sacrifice style for the sake of simplicity. In this article, we’ll explore the best simple fall nails that exude elegance without the hassle of intricate designs. From warm, earthy tones to minimalist patterns, we’ll dive into the top trends and timeless classics that will keep your nails looking great all season long.
By the end of this article, you’ll be equipped with the inspiration and know-how to create your own stunning, yet simple fall nails that are perfect for the upcoming season. Whether you’re a seasoned nail art enthusiast or a beginner looking for a low-maintenance design, we’ve got you covered. So, let’s dive in and explore the world of effortless, yet stylish nail design.
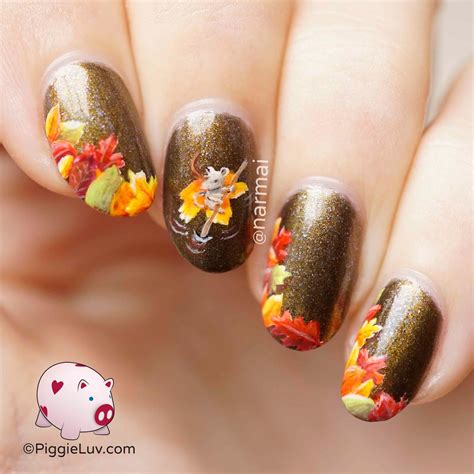
1. Warm Golden Leaves Nail Design

Fall is the perfect season to experiment with warm, golden shades on your nails. To create this look, you’ll need a base coat, a golden nail polish, a leaf-shaped nail sticker or stamp, and a top coat. Start by applying the base coat and letting it dry. Then, paint a thin layer of golden polish on each nail. While the polish is still wet, carefully place the leaf sticker or stamp on each nail, creating a random pattern. Finish off the look by applying a thin layer of top coat to seal in the design.
How to Take Your Golden Leaf Nail Design to the Next Level
- Use a combination of light and dark golden shades to create a sense of depth and dimension.
- Experiment with different leaf shapes and sizes to add visual interest.
- Add a few subtle, shimmery accents to give your nails a pop of sparkle.
2. Plaid Nail Art

Plaid is a classic fall pattern that looks great on nails. To create a plaid nail design, you’ll need a base coat, a variety of colored nail polishes, a nail art brush, and a top coat. Start by applying the base coat and letting it dry. Then, use the nail art brush to paint thin, horizontal stripes in a variety of colors. Next, paint thin, vertical stripes in a contrasting color, creating a crisscross pattern. Finish off the look by applying a thin layer of top coat to seal in the design.
Tips for Creating a Realistic Plaid Pattern
- Use a light hand when painting the stripes, as it’s easier to build up color gradually.
- Experiment with different color combinations to create a unique look.
- Use a nail polish corrector to clean up any mistakes or smudges.
3. Fall Florals Nail Design

Fall florals are a beautiful and elegant way to celebrate the season. To create this look, you’ll need a base coat, a floral nail sticker or stamp, a variety of colored nail polishes, and a top coat. Start by applying the base coat and letting it dry. Then, paint a thin layer of polish in a fall-inspired color, such as orange or yellow. While the polish is still wet, carefully place the floral sticker or stamp on each nail, creating a random pattern. Finish off the look by applying a thin layer of top coat to seal in the design.
How to Add Dimension to Your Fall Florals
- Use a combination of light and dark shades to create a sense of depth and dimension.
- Experiment with different floral patterns and arrangements to add visual interest.
- Add a few subtle, shimmery accents to give your nails a pop of sparkle.
4. Accent Nail Leaf Design

If you’re not feeling confident in your nail art skills, try creating an accent nail leaf design. To create this look, you’ll need a base coat, a leaf-shaped nail sticker or stamp, a variety of colored nail polishes, and a top coat. Start by applying the base coat and letting it dry. Then, paint a thin layer of polish in a fall-inspired color on all but one nail. On the remaining nail, carefully place the leaf sticker or stamp, creating a bold accent. Finish off the look by applying a thin layer of top coat to seal in the design.
Tips for Creating a Bold Accent Nail
- Use a bright, bold color to make the accent nail stand out.
- Experiment with different leaf shapes and sizes to add visual interest.
- Keep the rest of the nails simple and understated to let the accent nail shine.
5. Ombre Nail Design

Ombre is a beautiful and elegant way to celebrate the fall season. To create this look, you’ll need a base coat, a variety of colored nail polishes, and a top coat. Start by applying the base coat and letting it dry. Then, use a makeup sponge to gradate the polish colors from dark to light, creating an ombre effect. Finish off the look by applying a thin layer of top coat to seal in the design.
How to Create a Seamless Ombre Effect
- Use a light hand when gradating the colors, as it’s easier to build up color gradually.
- Experiment with different color combinations to create a unique look.
- Use a nail polish corrector to clean up any mistakes or smudges.
6. Glitter Nail Design
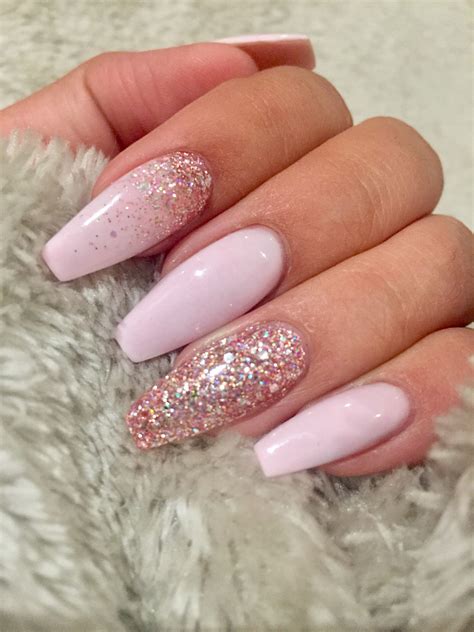
Glitter is a great way to add some sparkle and shine to your fall nail design. To create this look, you’ll need a base coat, a glitter nail polish, and a top coat. Start by applying the base coat and letting it dry. Then, paint a thin layer of glitter polish on each nail. Finish off the look by applying a thin layer of top coat to seal in the design.
Tips for Working with Glitter Polish
- Use a light hand when applying the glitter polish, as it can be easy to overdo it.
- Experiment with different glitter colors and shapes to add visual interest.
- Use a nail polish corrector to clean up any mistakes or smudges.
7. Striped Nail Design

Stripes are a classic fall pattern that look great on nails. To create a striped nail design, you’ll need a base coat, a variety of colored nail polishes, a nail art brush, and a top coat. Start by applying the base coat and letting it dry. Then, use the nail art brush to paint thin, horizontal stripes in a variety of colors. Finish off the look by applying a thin layer of top coat to seal in the design.
How to Create a Crisp, Clean Stripe
- Use a light hand when painting the stripes, as it’s easier to build up color gradually.
- Experiment with different color combinations to create a unique look.
- Use a nail polish corrector to clean up any mistakes or smudges.
8. Acorn Nail Design

Acorns are a cute and playful way to celebrate the fall season. To create this look, you’ll need a base coat, a brown nail polish, a white nail polish, and a top coat. Start by applying the base coat and letting it dry. Then, paint a thin layer of brown polish on each nail. While the polish is still wet, use a toothpick to create a small, white dot in the center of each nail, creating the acorn’s cap. Finish off the look by applying a thin layer of top coat to seal in the design.
Tips for Creating a Realistic Acorn
- Use a light hand when painting the brown polish, as it’s easier to build up color gradually.
- Experiment with different acorn shapes and sizes to add visual interest.
- Add a few subtle, shimmery accents to give your nails a pop of sparkle.
9. Leaf Accent Nail Design

A leaf accent nail is a beautiful and elegant way to celebrate the fall season. To create this look, you’ll need a base coat, a leaf-shaped nail sticker or stamp, a variety of colored nail polishes, and a top coat. Start by applying the base coat and letting it dry. Then, paint a thin layer of polish in a fall-inspired color on all but one nail. On the remaining nail, carefully place the leaf sticker or stamp, creating a bold accent. Finish off the look by applying a thin layer of top coat to seal in the design.
How to Add Dimension to Your Leaf Accent Nail
- Use a combination of light and dark shades to create a sense of depth and dimension.
- Experiment with different leaf shapes and sizes to add visual interest.
- Add a few subtle, shimmery accents to give your nails a pop of sparkle.
10. Monogrammed Leaf Nail Design
A monogrammed leaf nail design is a unique and personalized way to celebrate the fall season. To create this look, you’ll need a base coat, a leaf-shaped nail sticker or stamp, a variety of colored nail polishes, and a top coat. Start by applying the base coat and letting it dry. Then, paint a thin layer of polish in a fall-inspired color on all but one nail. On the remaining nail, carefully place the leaf sticker or stamp, creating a bold accent. While the polish is still wet, use a toothpick to create a small, monogrammed letter in the center of the leaf, using a contrasting color. Finish off the look by applying a thin layer of top coat to seal in the design.
Tips for Creating a Monogrammed Leaf
- Use a light hand when painting the monogram, as it’s easier to build up color gradually.
- Experiment with different monogram fonts and styles to add visual interest.
- Add a few subtle, shimmery accents to give your nails a pop of sparkle.
Simple Fall Nails FAQ
Everything You Need to Know About Fall Nail Trends
What are the most popular nail colors for fall?
Simple fall nails often feature warm, rich colors that evoke the feeling of fallen leaves and cozy sweaters. Some of the most popular nail colors for fall include deep reds, burnt oranges, and mossy greens. These earthy tones are perfect for creating a seasonal look that’s both stylish and understated.
How can I create a simple fall nail design at home?
Creating a simple fall nail design at home is easier than you think! Start by choosing a nail polish color that you love, and then add some subtle accents using nail stickers or stamps. You can also try using a nail dotting tool to create a simple leaf or acorn design. For a more rustic look, try using a texture top coat to give your nails a matte finish.
What are some simple fall nail art ideas?
If you’re looking for some inspiration for your simple fall nails, here are a few ideas to get you started:
- A single leaf motif on one or two accent nails
- A subtle plaid pattern created using strips of tape
- A few scattered acorns or pumpkins on a warm brown background
- A simple ombre effect in shades of orange and yellow
How can I make my nail polish last longer?
To make your nail polish last longer, start by prepping your nails with a base coat and finishing with a top coat. You can also try using a long-wear nail polish formula that’s specifically designed to last longer. In addition, be sure to avoid using your nails as tools (no opening packages or picking at things!) and wear gloves when washing dishes or doing other activities that might chip your nails.
Can I still wear bright colors in the fall?
While traditional fall colors tend to be more muted and earthy, there’s no rule that says you can’t wear bright colors in the fall! If you love bright colors, try pairing them with deeper, richer shades to create a look that’s both playful and seasonal. For example, you could wear a bright coral shade on your accent nail and pair it with a deep brown or green on the rest of your nails.
How can I incorporate negative space into my simple fall nail design?
Negative space is a great way to add some visual interest to your simple fall nails without making them too busy. Try using a nail polish that’s a shade or two deeper than your natural nail color to create a subtle, ombre-inspired look. You can also use nail stickers or stamps to create a fun design that incorporates negative space. For example, you could create a simple leaf shape using a white or light brown polish, and then leave the rest of your nail bare to create a negative space effect.
Conclusion
You made it to the end of our fall nail adventure. We explored 10 amazing simple fall nail ideas that are perfect for the season, from warm and cozy colors to fun and creative designs.
Remember, the key to pulling off these looks is to keep it simple and have fun with it. Don’t be afraid to experiment with different colors and patterns until you find the one that feels like you.
Now that you’ve got the inspiration, it’s time to get creative. Gather your nail polish and get ready to try out some of these simple fall nail ideas. You can even make it a fun DIY project with friends or family.
Whether you’re a nail art newbie or a seasoned pro, these ideas are perfect for adding a touch of fall flair to your look. So go ahead, get creative, and show off your simple fall nails. Happy painting


